PythonRasPi
Contents
The plan[edit]
Raspberry Pi is all about connecting input and output devices to it, and then playing with the data... We'll start off easy and try having an LED that blinks when a button is pressed (yeah, I know, this is really why you should buy a Raspberry Pi), and eventually add more logic to it... So understanding input and output is what we'll do here.
We'll then look into the different protocols (UART, I2C, ...) and how to interact with these.
This obviously is possible in a wide range or languages, but we'll stick to Python because it's so well documented and supported by the RasPi community.
The format of this workshop will be a collaborative discovery path. So let's all come (a bit or highly) prepared, and we'll figure out stuff together. If you're experienced, please come over and your presence in the space will be appreciated. :)
What you'll be needing[edit]
- a Raspberry Pi (whatever model you have, there are a few available to buy in the space) running Raspbian
- a breadboard
- Jumper wires (male-female)
- a few output devices you happen to have lying around (LED's, a tiny motor, a relay, a tiny display, ...)
- a few input devices you happen to have lying around (buttons, sensors, ...)
- some resistors and/or additional hardware to safely connect the items
- the documentation/datasheets (especially if you have specific input or output devices)
Interesting links for preparation[edit]
- youTube series on RaspBerry Pi
- Makezine Tutorial page
- OpenMicros tut
- RPIO documentation (GPIO RasPi Python library)
- RasPi and buttons and switches
The results[edit]
The notes are on PiratePad: http://piratepad.be/p/raspi-fun
Interesting links[edit]
Fun little tips[edit]
- Use ptpython (especially on a computer, RasPi might be a bit underpowered)
- sudo apt-get install python-pip
- pip install ptpython
- Nice chip for analog fun: LM339
- PiFM: FM Transmitter based on GPIO
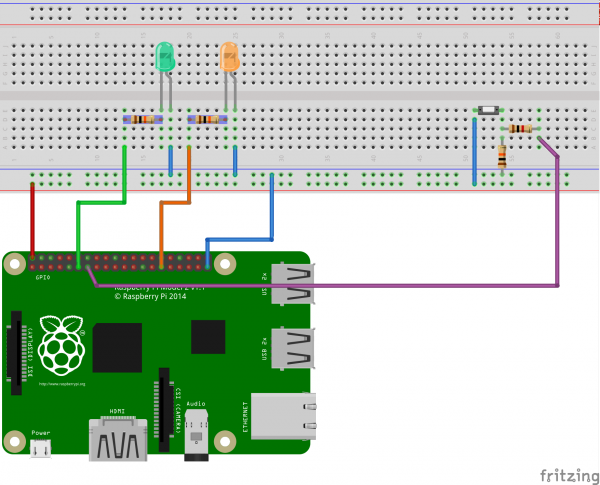
Breadboard schematics for exercises[edit]
Sending output to a GPIO pin[edit]
Really simple flashing light code: (2 LED's on IO17 and IO18)
import RPi.GPIO as GPIO  // This is by default already installed in Raspbian, just need to import it in python
from time import sleep   // Small helper function to add delays
GPIO.setmode(GPIO.BCM)   // Use numbering of pins according to BCM model, not physical pin numbering
GPIO.setup(18, GPIO.OUT) // Setting a pin to output mode
GPIO.setup(17, GPIO.OUT)
while(True):
    GPIO.output(18, True)  // Turn on the voltage on pin IO18
    sleep(0.5)
    GPIO.output(18, False) // Turn off the voltage on pin IO18
    GPIO.output(17, True)
    sleep(0.5)
    GPIO.output(17, False)
Getting input from a GPIO-pin[edit]
import RPi.GPIO as GPIO
from time import sleep
GPIO.setmode(GPIO.BCM)
GPIO.setup(18, GPIO.OUT)
GPIO.setup(17, GPIO.OUT)
GPIO.setup(27, GPIO.IN)   // Setting pin IO27 as an input pin

while(True):
    if(GPIO.input(27)):    // Do this when the button is pressed (voltage on pin is high)
        GPIO.output(18, True)  // Turn on  pin 18
        GPIO.output(17, False) // Turn off pin 17
    else:                  // Do this when button is released (voltage on pin is low
        GPIO.output(18, False) // Turn off pin 18
        GPIO.output(17, True)  // Turn on  pin 17
Using interrupts[edit]
This program will react to a GPIO, and turn on/off a LED on another port depending on the value sensed. Pin acts both as input as output.
import RPi.GPIO as GPIO
from time import time, sleep
GPIO.setmode(GPIO.BCM)

GPIO.setup(17, GPIO.OUT)
GPIO.setup(27, GPIO.IN, GPIO.PUD_UP)

mode = True
def on_change(pin):
    global mode
    GPIO.output(17, mode)
    mode = not mode

GPIO.add_event_detect(27, GPIO.BOTH)
GPIO.add_event_callback(27, on_change)

raw_input('Enter to exit...')

